Use
Launching the gateway
For a regular installation
python -m TheengsGateway -H "<mqtt_broker_host_ip>" -u "username" -p "password"For a Docker container
To run it with minimum required parameters required:
docker run --rm \
    --network host \
    -e MQTT_HOST=<mqtt_broker_host_ip> \
    -v /var/run/dbus:/var/run/dbus \
    --name TheengsGateway \
theengs/gatewayTIP
If you've installed your MQTT broker on the same instance as the gateway, you can use localhost as the <mqtt_broker_host_ip>.
Automatically launching the gateway as a systemd service
If you want Theengs Gateway to automatically start on booting your Linux distribution, you can accomplish this by creating a systemd service for it.
First, make sure to install Theengs Gateway as a pip package (not with sudo or as a root user).
Then create this systemd service script in /etc/systemd/system/TheengsGateway.service:
[Unit]
Description=Theengs Gateway
Requires=bluetooth.target network-online.target

[Service]
Restart=always
Type=simple
User=pi
ExecStart=/usr/bin/python3 -m TheengsGateway -H host -u user -p password

[Install]
WantedBy=multi-user.targetUse your host, username, and password for the MQTT broker, and set any other options you need in the ExecStart line. Change the user after User= to your local username (not root).
If you've installed Theengs Gateway in a Python virtual environment, just refer to the full path of the environment's python3 binary in the ExecStart line, such as /home/pi/theengs/bin/python3 instead of /usr/bin/python3.
Then reload the service files and start and enable the system service:
sudo systemctl daemon-reload
sudo systemctl enable --now TheengsGateway.serviceCheck whether the gateway is running:
systemctl status TheengsGatewayCheck the logs if something's wrong:
journalctl -xeThe gateway stores its configuration in a file theengsgw.conf in your home directory. So after the systemd service has started successfully, you may remove all options from the ExecStart line in the systemd service file, as the gateway reads the configuration from that file.
Checking the data published by the gateway
Once the command launched you should see MQTT payloads appearing on the broker. To visualize these data you have to use an MQTT client tool.
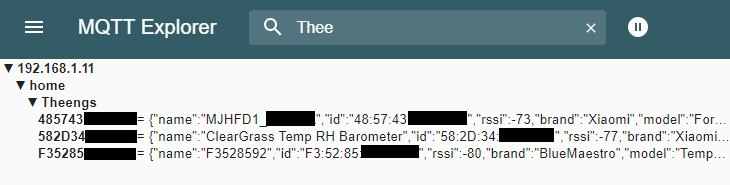
Example payload received:
{"name":"F35285","id":"F3:52:85","rssi":-82,"brand":"BlueMaestro","model":"TempoDisc","model_id":"BM_V23","tempc":24.1,"tempf":75.38,"hum":104.7,"dp":24.8,"volt":2.56,"mfr":"Blue Maestro Limited"}The mfr key has the company name of the manufacturer as its value in two cases:
- Theengs Gateway has successfully decoded the advertisement of the device, its manufacturer data have a company ID compliant to the Bluetooth specification, and it's no beacon (iBeacon, Microsoft Advertising Beacon).
- Theengs Gateway isn't able to decode the advertisement of the device.
Note that in the latter case, there's guarantee that the manufacturer name is correct, as many devices aren't compliant to the Bluetooth specification and encode their data in the bytes where the manufacturer ID should be.
Details options
For a regular installation
C:\Users\1technophile>python -m TheengsGateway -h
usage: TheengsGateway [-h] [-a ADAPTER] [-b BLE] [-bk ADDRESS [BINDKEY ...]]
                      [-bl ADDRESS [ADDRESS ...]]
                      [-c CONFIG] [-D DISCOVERY]
                      [-Df DISCOVERY_FILTER [DISCOVERY_FILTER ...]]
                      [-Dn DISCOVERY_DEVICE_NAME]
                      [-Dt DISCOVERY_TOPIC] [-Gp GENERAL_PRESENCE] [-H HOST]
                      [-id ADDRESS [IRK ...]]
                      [-Lt LWT_TOPIC] [-ll {DEBUG,INFO,WARNING,ERROR,CRITICAL}]
                      [-P PORT] [-p PASS] [-pa PUBLISH_ALL] [-padv PUBLISH_ADVDATA]
                      [-pr PRESENCE] [-prt PRESENCE_TOPIC] [-pt PUBLISH_TOPIC]
                      [-s {active,passive}] [-sd BLE_SCAN_TIME] [-st SUBSCRIBE_TOPIC]
                      [-tb BLE_TIME_BETWEEN_SCANS] [-tf TIME_FORMAT] [-ti TLS_INSECURE]
                      [-tls ENABLE_TLS] [-ca CA_FILE] [-ts TIME_SYNC [TIME_SYNC ...]] [-u USER]
                      [-wl ADDRESS [ADDRESS ...]]
                      [-ws ENABLE_WEBSOCKET]

options:
  -h, --help            show this help message and exit
  -a ADAPTER, --adapter ADAPTER
                        Bluetooth adapter (e.g. hci1 on Linux)
  -b BLE, --ble BLE     Enable (1) or disable (0) BLE (default: 1)
  -bk ADDRESS [BINDKEY ...], --bindkeys ADDRESS [BINDKEY ...]
                        Device MAC addresses and their bindkeys: ADDR1 KEY1 ADDR2 KEY2
  -bl ADDRESS [ADDRESS ...], --blacklist ADDRESS [ADDRESS ...]
                        MAC addresses of Bluetooth devices to ignore, all other devices are allowed
  -c CONFIG, --config CONFIG
                        Path to the configuration file (default: ~/theengsgw.conf)
  -D DISCOVERY, --discovery DISCOVERY
                        Enable(1) or disable(0) Home Assistant MQTT discovery
  -Df DISCOVERY_FILTER [DISCOVERY_FILTER ...], --discovery_filter DISCOVERY_FILTER [DISCOVERY_FILTER ...]
                        Device discovery filter list for Home Assistant MQTT discovery
  -Dn DISCOVERY_DEVICE_NAME, --discovery_device_name DISCOVERY_DEVICE_NAME
                        Device name for Home Assistant MQTT discovery
  -Dt DISCOVERY_TOPIC, --discovery_topic DISCOVERY_TOPIC
                        MQTT Discovery topic
  -Gp GENERAL_PRESENCE, --general_presence GENERAL_PRESENCE
                        Enable (1) or disable (0) general present/absent presence when --discovery: 0
  -H HOST, --host HOST  MQTT host address
  -id ADDRESS [IRK ...], --identities ADDRESS [IRK ...]
                        Identity MAC addresses and their IRKs: ADDR1 IRK1 ADDR2 IRK2
  -iwbl IGNORE_WBLIST, --ignore_wblist IGNORE_WBLIST
                        Ignore a set white- or black-list (1) or not (0)
                        (default: 0)
  -Lt LWT_TOPIC, --lwt_topic LWT_TOPIC
                        MQTT LWT topic
  -ll {DEBUG,INFO,WARNING,ERROR,CRITICAL}, --log_level {DEBUG,INFO,WARNING,ERROR,CRITICAL}
                        TheengsGateway log level
  -P PORT, --port PORT  MQTT host port
  -p PASS, --pass PASS  MQTT password
  -pa PUBLISH_ALL, --publish_all PUBLISH_ALL
                        Publish all (1) or only decoded (0) advertisements (default:
                        1)
  -padv PUBLISH_ADVDATA, --publish_advdata PUBLISH_ADVDATA
                        Publish advertising and advanced data (1) or not (0)
                        (default: 0)
  -pr PRESENCE, --presence PRESENCE
                        Enable (1) or disable (0) presence publication (default: 1)
  -prt PRESENCE_TOPIC, --presence_topic PRESENCE_TOPIC
                        MQTT presence topic
  -pt PUBLISH_TOPIC, --publish_topic PUBLISH_TOPIC
                        MQTT publish topic
  -s {active,passive}, --scanning_mode {active,passive}
                        Scanning mode (default: active)
  -sd BLE_SCAN_TIME, --ble_scan_time BLE_SCAN_TIME
                        BLE scan duration (seconds)
  -st SUBSCRIBE_TOPIC, --subscribe_topic SUBSCRIBE_TOPIC
                        MQTT subscribe topic
  -tb BLE_TIME_BETWEEN_SCANS, --ble_time_between_scans BLE_TIME_BETWEEN_SCANS
                        Seconds to wait between scans
  -tf TIME_FORMAT, --time_format TIME_FORMAT
                        Use 12-hour (1) or 24-hour (0) time format for clocks
                        (default: 0)
  -ca CA_FILE, --ca_certs CA_FILE
                        Path to file containing custom Certificate Authorities for TLS validation
  -ti TLS_INSECURE, --tls_insecure TLS_INSECURE
                        Allow (1) or disallow (0: default) insecure TLS (no hostname check)
  -tls ENABLE_TLS, --enable_tls ENABLE_TLS
                        Enable (1) or disable (0) TLS (default: 0)
  -ts TIME_SYNC [TIME_SYNC ...], --time_sync TIME_SYNC [TIME_SYNC ...]
                        MAC addresses of Bluetooth devices to synchronize the time
  -to TIME_UNTIL, --tracker_timeout TIME_UNTIL
                        Seconds after which a discovered device tracker not being received is published as offline/away
                        (default: 120)
  -u USER, --user USER  MQTT username
  -wl ADDRESS [ADDRESS ...], --whitelist ADDRESS [ADDRESS ...]
                        MAC addresses of Bluetooth devices to allow, all other devices are ignored
  -ws ENABLE_WEBSOCKET, --enable_websocket ENABLE_WEBSOCKET
Enable (1) or disable (0) WebSocket (default: 0)For a Docker container
docker run --rm \
    --network host \
    -e MQTT_HOST=<host_ip> \
    -e MQTT_USERNAME=<username> \
    -e MQTT_PASSWORD=<password> \
    -e MQTT_PUBLISH_TOPIC=home/TheengsGateway/BTtoMQTT \
    -e MQTT_SUBSCRIBE_TOPIC=home/+/BTtoMQTT/undecoded \
    -e PUBLISH_ALL=true \
    -e BLE_TIME_BETWEEN_SCANS=60 \
    -e BLE_SCAN_TIME=5 \
    -e LOG_LEVEL=INFO \
    -e HAAS_DISCOVERY=true \
    -e GENERAL_PRESENCE=false \
    -e DISCOVERY=true \
    -e DISCOVERY_TOPIC=homeassistant \
    -e DISCOVERY_DEVICE_NAME=TheengsGateway \
    -e DISCOVERY_FILTER="[IBEACON,GAEN,MS-CDP,APPLE_CONT,APPLE_CONTAT]" \
    -e SCANNING_MODE=active \
    -e ADAPTER=hci0 \
    -e IDENTITIES="{\"CC:AA:CC:DD:CC:CC\": \"keykeykeykeykeykey==\"}" \
    -v /var/run/dbus:/var/run/dbus \
    --name TheengsGateway \
theengs/gatewayPublish to a 2 levels topic
python -m TheengsGateway -H "192.168.1.17" -u "username" -p "password" -pt "home/TheengsGateway"Scan every 55 s
python -m TheengsGateway -H "192.168.1.17" -u "username" -p "password" -pt "home/TheengsGateway" -tb 55Configuration record
Once you have entered your credentials and parameters, Theengs Gateway saves them into a configuration file theengsgw.conf into your user directory and you can simply launch the gateway by using:
python -m TheengsGatewayMQTTtoMQTT decoding
Theengs Gateway decodes messages with Bluetooth Low Energy (BLE) data sent to the subscribe topic, and publishes the decoded result to the publish topic. This allows for offloading the decode operation from other devices, such as an ESP32, to enhance performance.
The data sent to the topic should be in JSON format and must have at least an "id" entry.
Example message:
{
  "id":"54:94:5E:9F:64:C4",
  "mac_type":1,
  "manufacturerdata":"4c0010060319247bbc68",
  "rssi":-74,
  "txpower":12
}If possible, the gateway decodes and publishes the data.
OpenMQTTGateway, proposes a web upload binary esp32dev-ble-mqtt-undecoded that publishes directly to home/<gateway name>/BTtoMQTT/undecoded making it directly compatible with Theengs Gateway MQTTtoMQTT decoding feature.
TIP
By default Theengs Gateway listens to home/+/BTtoMQTT/undecoded, if you have several ESP32 gateways with OpenMQTTGateway sending out MQTT messages with undecoded data, Theengs picks up all of them and centralizes the decoded BLE sensor data in one place.
Home Assistant auto discovery
If enabled (default), decoded devices publish their configuration to Home Assistant so the latter can discover them.
- You can enable/disable this with the
-Dor--discoverycommand line argument with a value of 1 (enable) or 0 (disable). - You can set the discovery topic with the
-Dtor--discovery_topiccommand line argument. - You can set the discovery name with the
-Dnor--discovery_device_namecommand line argument. - You can filter devices from discovery with the
-Dfor--discovery_filterargument which takes a list of device model ID to filter.
The IBEACON and random MAC devices (APPLE*, MS-CDP and GAEN) aren't discovered as their addresses (IDs) change over time resulting in multiple discoveries.
* INFO
Home Assistant discovers an Apple Watch, iPhone, iPad or AirPods if you've configured their Identity MAC address and IRK.
Discovered device tracker timeout
NOTE
-to TIME_UNTIL, --tracker_timeout needs to be at least longer than BLE_TIME_BETWEEN_SCANS + BLE_SCAN_TIME to avoid any unwanted temporary offline status messages for discovered trackers.
Passive scanning
Passive scanning (-s passive or --scanning_mode passive) only works on Windows or Linux kernel >= 5.10 and BlueZ >= 5.56 with experimental features enabled.
To enable experimental features in BlueZ on a Linux distribution that uses systemd, run the following command:
sudo systemctl edit bluetooth.serviceThen add the following lines:
[Service]
ExecStart=
ExecStart=/usr/lib/bluetooth/bluetoothd --experimentalTIP
On other Linux variants the path might be slightly different. You can usually see this by the commented out entries of ExecStart=… when editing bluetooth.service or with the which bluetoothd command.
Save and close the file and then run the following commands:
sudo systemctl daemon-reload
sudo systemctl restart bluetooth.serviceTime synchronization
If you have specified the Bluetooth MAC addresses of supported clocks with the --time_sync argument, Theengs Gateway automatically synchronizes their time once a day. Therefore, make sure to correctly set your gateway's time.
Some Bluetooth clocks let you choose between 12-hour (AM/PM) and 24-hour format to show their time. Use the argument --time_format 0 (default) for 24-hour format and --time_format 1 for 12-hour format.
Note that the first time synchronization of each specified clock happens at a random time in the next day. This way the gateway spaces out connections to these devices in time. After this first time synchronization, Theengs Gateway synchronizes its time every 24 hours.
If a device isn't recognized as a supported clock, Theengs Gateway won't try to synchronize its time ever. But if there are other errors, such as connection errors or write errors (which could be temporary), the device is still tried every 24 hours.
If you want to know which of your devices Theengs Gateway's time synchronization feature supports, run the following command:
bluetooth-clocks discoverTheengs Gateway installs the bluetooth-clocks command as part of its dependencies.
Reading encrypted advertisements
If you want to read encrypted advertisements, you need to add a bindkey for each device MAC address with the --bindkeys argument. For example:
TheengsGateway --bindkeys 00:11:22:33:44:55:66 0dc540f3025b474b9ef1085e051b1add AA:BB:CC:DD:EE:FF 6385424e1b0341109942ad2a6bb42e58Theengs Gateway then uses the bindkey 0dc540f3025b474b9ef1085e051b1add to decrypt all advertisements from device 00:11:22:33:44:55:66 and bindkey 6385424e1b0341109942ad2a6bb42e58 for all advertisements from device AA:BB:CC:DD:EE:FF.
Victron Energy devices prerequisite and bindkey retrieval
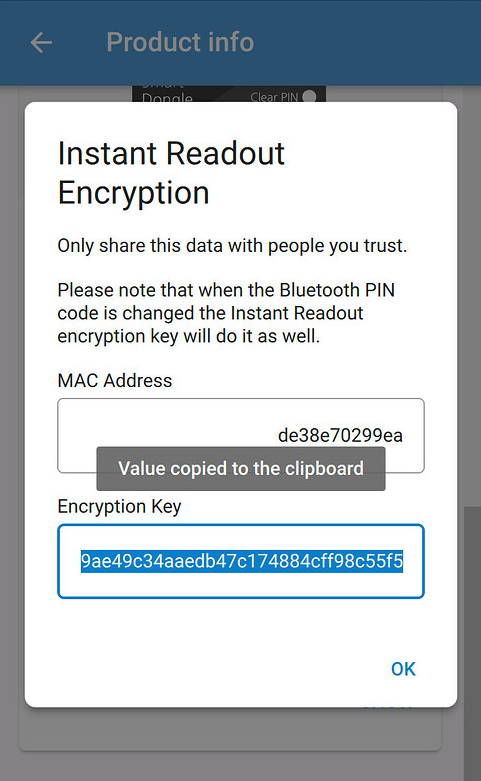
To allow for decryption and decoding of BLE advertisement broadcasts, in the Victron Energy app, Bluetooth needs to be enabled as well as the Instant Readout option for each device.
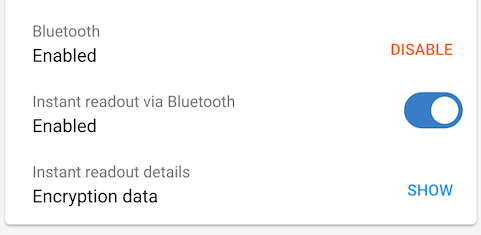
Selecting SHOW for the Encryption Data opens a view with the Bluetooth MAC address and bindkey (Encryption Key) for adding to Theengs Gateway as described in the section above.
Resolving random private addresses
If you want to resolve random private MAC addresses into a device's identity MAC address, you need to add an Identity Resolving Key (IRK) for each identity address with the --identities argument. For example:
TheengsGateway --identities 00:11:22:33:44:55:66 0dc540f3025b474b9ef1085e051b1add AA:BB:CC:DD:EE:FF 6385424e1b0341109942ad2a6bb42e58Theengs Gateway then uses the identity resolving key 0dc540f3025b474b9ef1085e051b1add to resolve random private addresses from device 00:11:22:33:44:55:66 and identity resolving key 6385424e1b0341109942ad2a6bb42e58 to resolve random private addresses from device AA:BB:CC:DD:EE:FF.
You can also specify the identity resolving key as a Base64 encoded string, such as "MGRjNTQwZjMwMjViNDc0YjllZjEwODVlMDUxYjFhZGQ=".
Getting Identity Resolving Key (IRK) for Apple Watch, iPhone, iPad and AirPods
To get the Bluetooth Identity Address of an Apple Watch, iPhone or iPad, go to Settings > General > About on the device and view the MAC address stated under Bluetooth.
For AirPods go to the System Report (Apple menu > About This Mac) on a related Mac and view the Bluetooth Identity Address in the Bluetooth section of the System Information.
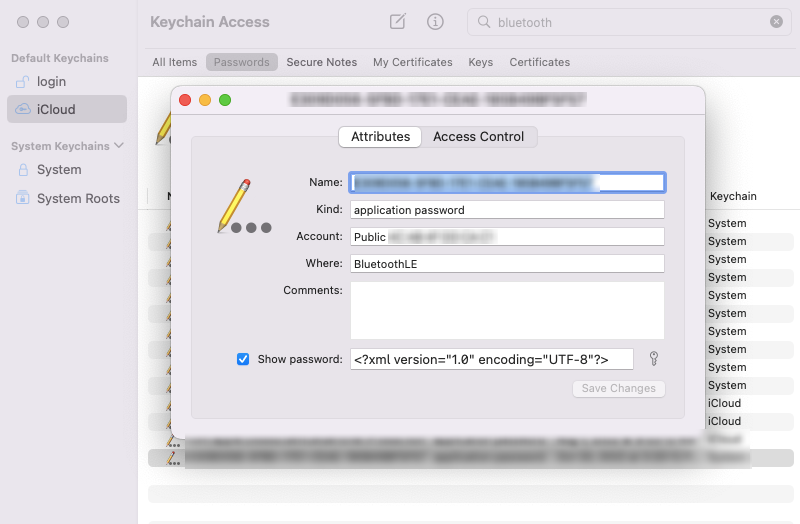
On a Mac associated with your devices, open the Keychain Access application and search the login or iCloud Keychain - depending on whether you have iCloud Password and Keychain syncing activated or not - for either Bluetooth or the identity address you got for your device as described previously.
When you open the Keychain entry, in the Account field it should confirm the identity address as Public AA:BB:CC:DD:EE:FF.
Tick the Show Password checkbox and enter your macOS password to then select and copy the whole content of the field. Paste the content into an empty TextEdit document and look for the Remote IRK.
Now use this remote IRK to launch the gateway with the public address of your device tracked.
Example:
- Public MAC address: 11:22:33:44:55:66
- IRK: WERknmckjn51464saa==
TheengsGateway --identities 11:22:33:44:55:66 WERknmckjn51464saa==As a result, you can see your device information published in the connected MQTT broker under home/TheengsGateway/BTtoMQTT/112233445566
{"manufacturerdata": "2c0q1006191e7v30x6fa", "id": "11:22:33:44:55:66", "rssi": -42, "brand": "Apple", "model": "Apple iPhone/iPad", "model_id": "APPLEDEVICE", "type": "TRACK", "track": true, "unlocked": false, "distance": 0.03341741003670675}You can now enjoy local presence tracking based on your Apple devices.
Without a Mac: How to convert an Identity Resolving Key (IRK) for Apple Watch, iPhone or iPad retrieved by ESPresense
Any IRk in hex format retrieved by ESPresense needs to be octet/byte-wise reversed to be compatible in Theengs Gateway.
You can use online converters like the following for this. Make sure to delete the leading hex identifier 0x from the result.